


Alright, welcome back to Gnomestones. Last time we made the beginning of a 9x5 hexmap. Then the Hex Map Editor program got updated, sending me back to square (hex) 1. But this is not a time for the faint at heart!
Q: What happens when a gnome falls off of the mole?
A: It quivers in the dirt until the coast is clear.
But I am not a gnome. And so I must persevere!

When we left off, we had the village of Galgar, the Peaks of Peulin, and Redvale Castle. This is the heart of our map, and now it’s time to add the rest of the locations. There are a few ways we could proceed. The Sandbox Generator suggests a system where every hex is filled in, but I prefer a map with one location about every three or four hexes. We’ll still use The Sandbox Generator tools, but with modifications to fit our purposes.
Per usual, our ethos here is to make a map that is unplanned and improvisational while using the generator tools in a page-by-page manner. We will apply our GM filter by choosing the features’ locations and giving the places context, but we hope to minimize re-rolling.
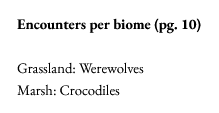
Taking it from the top, in the encounters section I get werewolves and crocodiles. The crocodiles can form a natural barrier in the eastern marsh and the were-cult can haunt the northern grassland, so this is a fine start. I want to spiff it up though, so I use a couple of charts for inspiration, and now the werewolves are were-songbirds, and the crocodiles have the ability to change their flesh into mud (for hunting reasons).

Moving on, we’ll use the Features section on page 11 to fill in more hexes. It helps to have a few Features rolled up so we can consider how they fit together. We roll a set of ten, and then add some biome encounters from the supplement for good measure.

Here’s where we first run into difficulty. The Features section can take us in drastically different directions depending on our roll. For example, the Landmark section has a nice flow which allows us to generate several locations in quick succession. In contrast, the Dungeon section is geared towards creating massive underground complexes, and could quickly derail our progress if we let it. The notes for Location #2 are only a fraction of the details we could have included for the Infernal Pits.
Meanwhile, The Settlement sections (village, abbey, castle, etc.) have medium complexity. Finally, Lairs depend on the creature in them, and could be the simplest of the bunch. The charts fit their tasks well enough, and it’s possible they’d work better if we’d played the map hex by hex. But on our grand mystery tour of map generation tools, we’d prefer a smoother workflow. Anyway, here’s our map at the midway point.
There are three major plots shaping up. First is the drama with the castle-bound witch-duchess and the town rioters. Second, there’s an alluring dungeon in the deep jungle, but the broken bridge and crocs in the marsh make it hard to get to. Third, the mining camp of Rundur faces several hazards from demons, bats, and ravine creatures. All of these could threaten safe passage down the road, cutting Galgar and the eastern valley off from the rest of the realm.
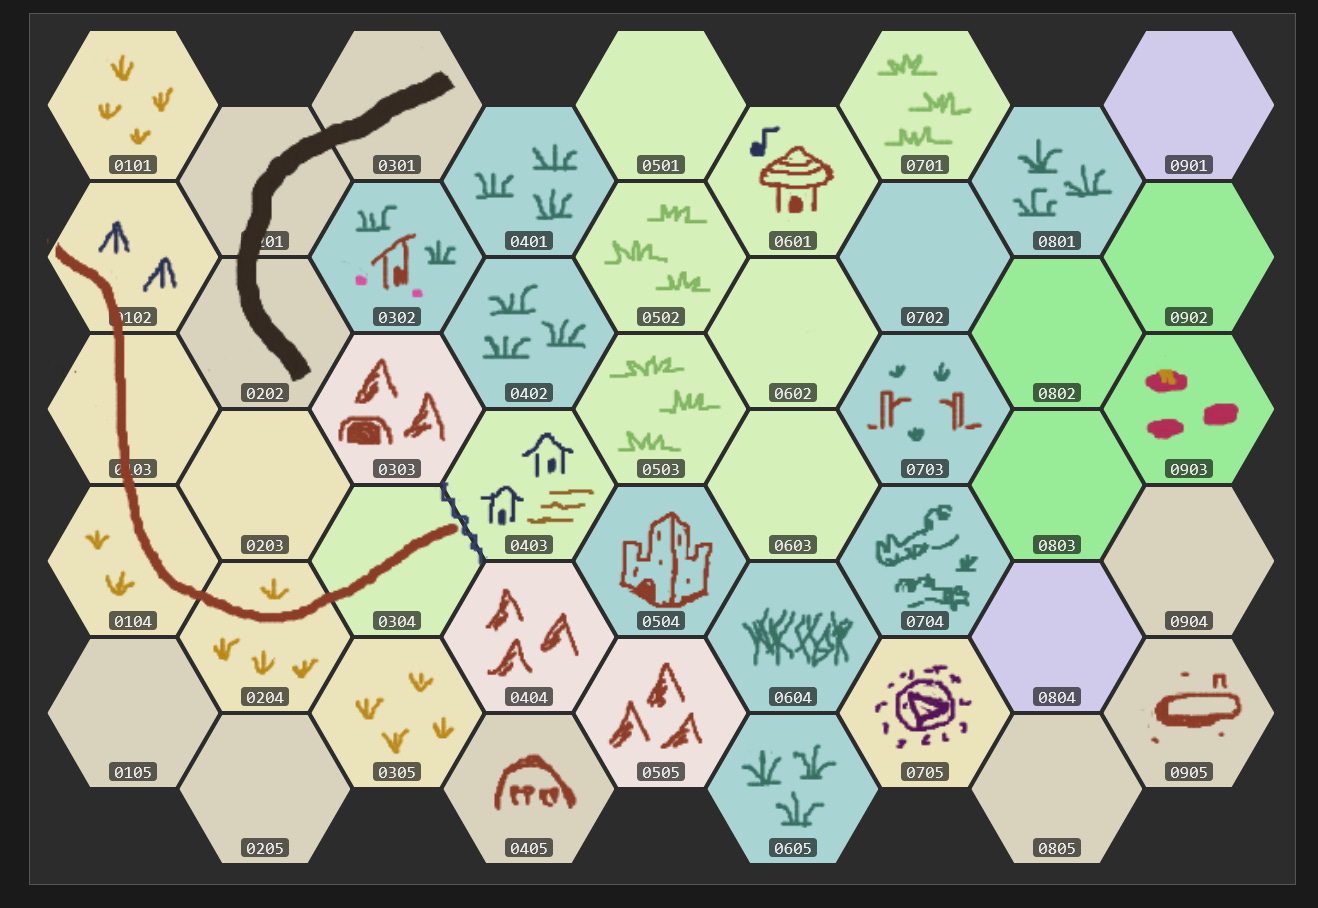
Now we’re in the final stretch. We want to fill up the rest of the map while adding a couple more points of intrigue. However, it’s very important that we don’t overfill the map. That would ruin everything.

After attending to the llamas, bandits, and frozen lizardmen, there wasn’t much room left. Remember, don’t overcrowd that map! I rolled up an abbey and a tower to test their respective sections. Both are fun. Then I bring in one more random location before calling it done. Here’s our finished product. Each location fits snugly in its spot and I can’t imagine switching them around now, in my opinion a mark of a good map. It could use more gnomes but oh well.
What should we call it? Valley Peulin? The Eastmarsh? I decide to go for the naming tables in the Settlement section as there’s a lot of good stuff in there that could be utilized more. The chart uses odd-yet-intriguing naming conventions that I’m still getting used to, but I’m eventually able to wrangle out the name Stonesalt Pass. At this point I’m at the mercy of the dice to get across the finish line.
Great success! In order to wrap it up, here’s a baseline review for the two resources, in the classic Gnomestones style.
THE GOOD THE BAD AND THE CRUNCHY
Hex Map Editor
Good: An excellent little program. I was able to make a map with its own style using the draw tool. The interface is simple and easy to understand. It’s still in development, so there are likely more features to be added.
Bad: Sweet tunnels of Gurshthrumil this program needs a CTRL-Z function, and a drag and drop feature while were at it. Most people won’t be so determined.
Crunchy: It’s possible to save your color palette with careful clicking. I put the hex colors on the top row and the draw colors on the bottom. I ended up only needing a handful of colors, better for map concision anyway.
The Sandbox Generator
Good: Awesome structure, approachable art design, bursting with unique approaches and creative tools. One of the better resources for filling hexmaps. High potential for soloplay. The creators of the resource offer several supplements like the Biome package which will give you even more possibilities and custom options.
Bad: Features vary significantly in complexity, dungeon generation system can easily tell you to make a dungeon with over 100 room. I needed to keep referring back to features table for each new location, impacting ease of use.
Crunchy: There are high quality naming tables in the Settlements section that could be applied to give the locations unique flavor. Without this addition, the locations can feel generic compared to what comes out of the Cairn generator. The tables of nouns and adjectives don’t even show up that much in the naming rolls, because the naming convention tables are structured so oddly.
Well that’s all for Gnomestones. Stick around and I’ll scam you for your shoelaces. Git!
FYI, the link to Hex Map Editor isn’t working.